Better Rolled Hems

Rolled hems are delicate and beautiful. They make a great finish to a handkerchief or scarf. For 18th-century English sewing they were the foundation for millinery (accessories). I have noticed that beginners when trying to achieve a rolled hem will do a couple of things:

-they will not roll enough fabric into the hem to keep the raw edges encased.

-they will try to flatten the hem vs. keep it truly rolled and lofty.

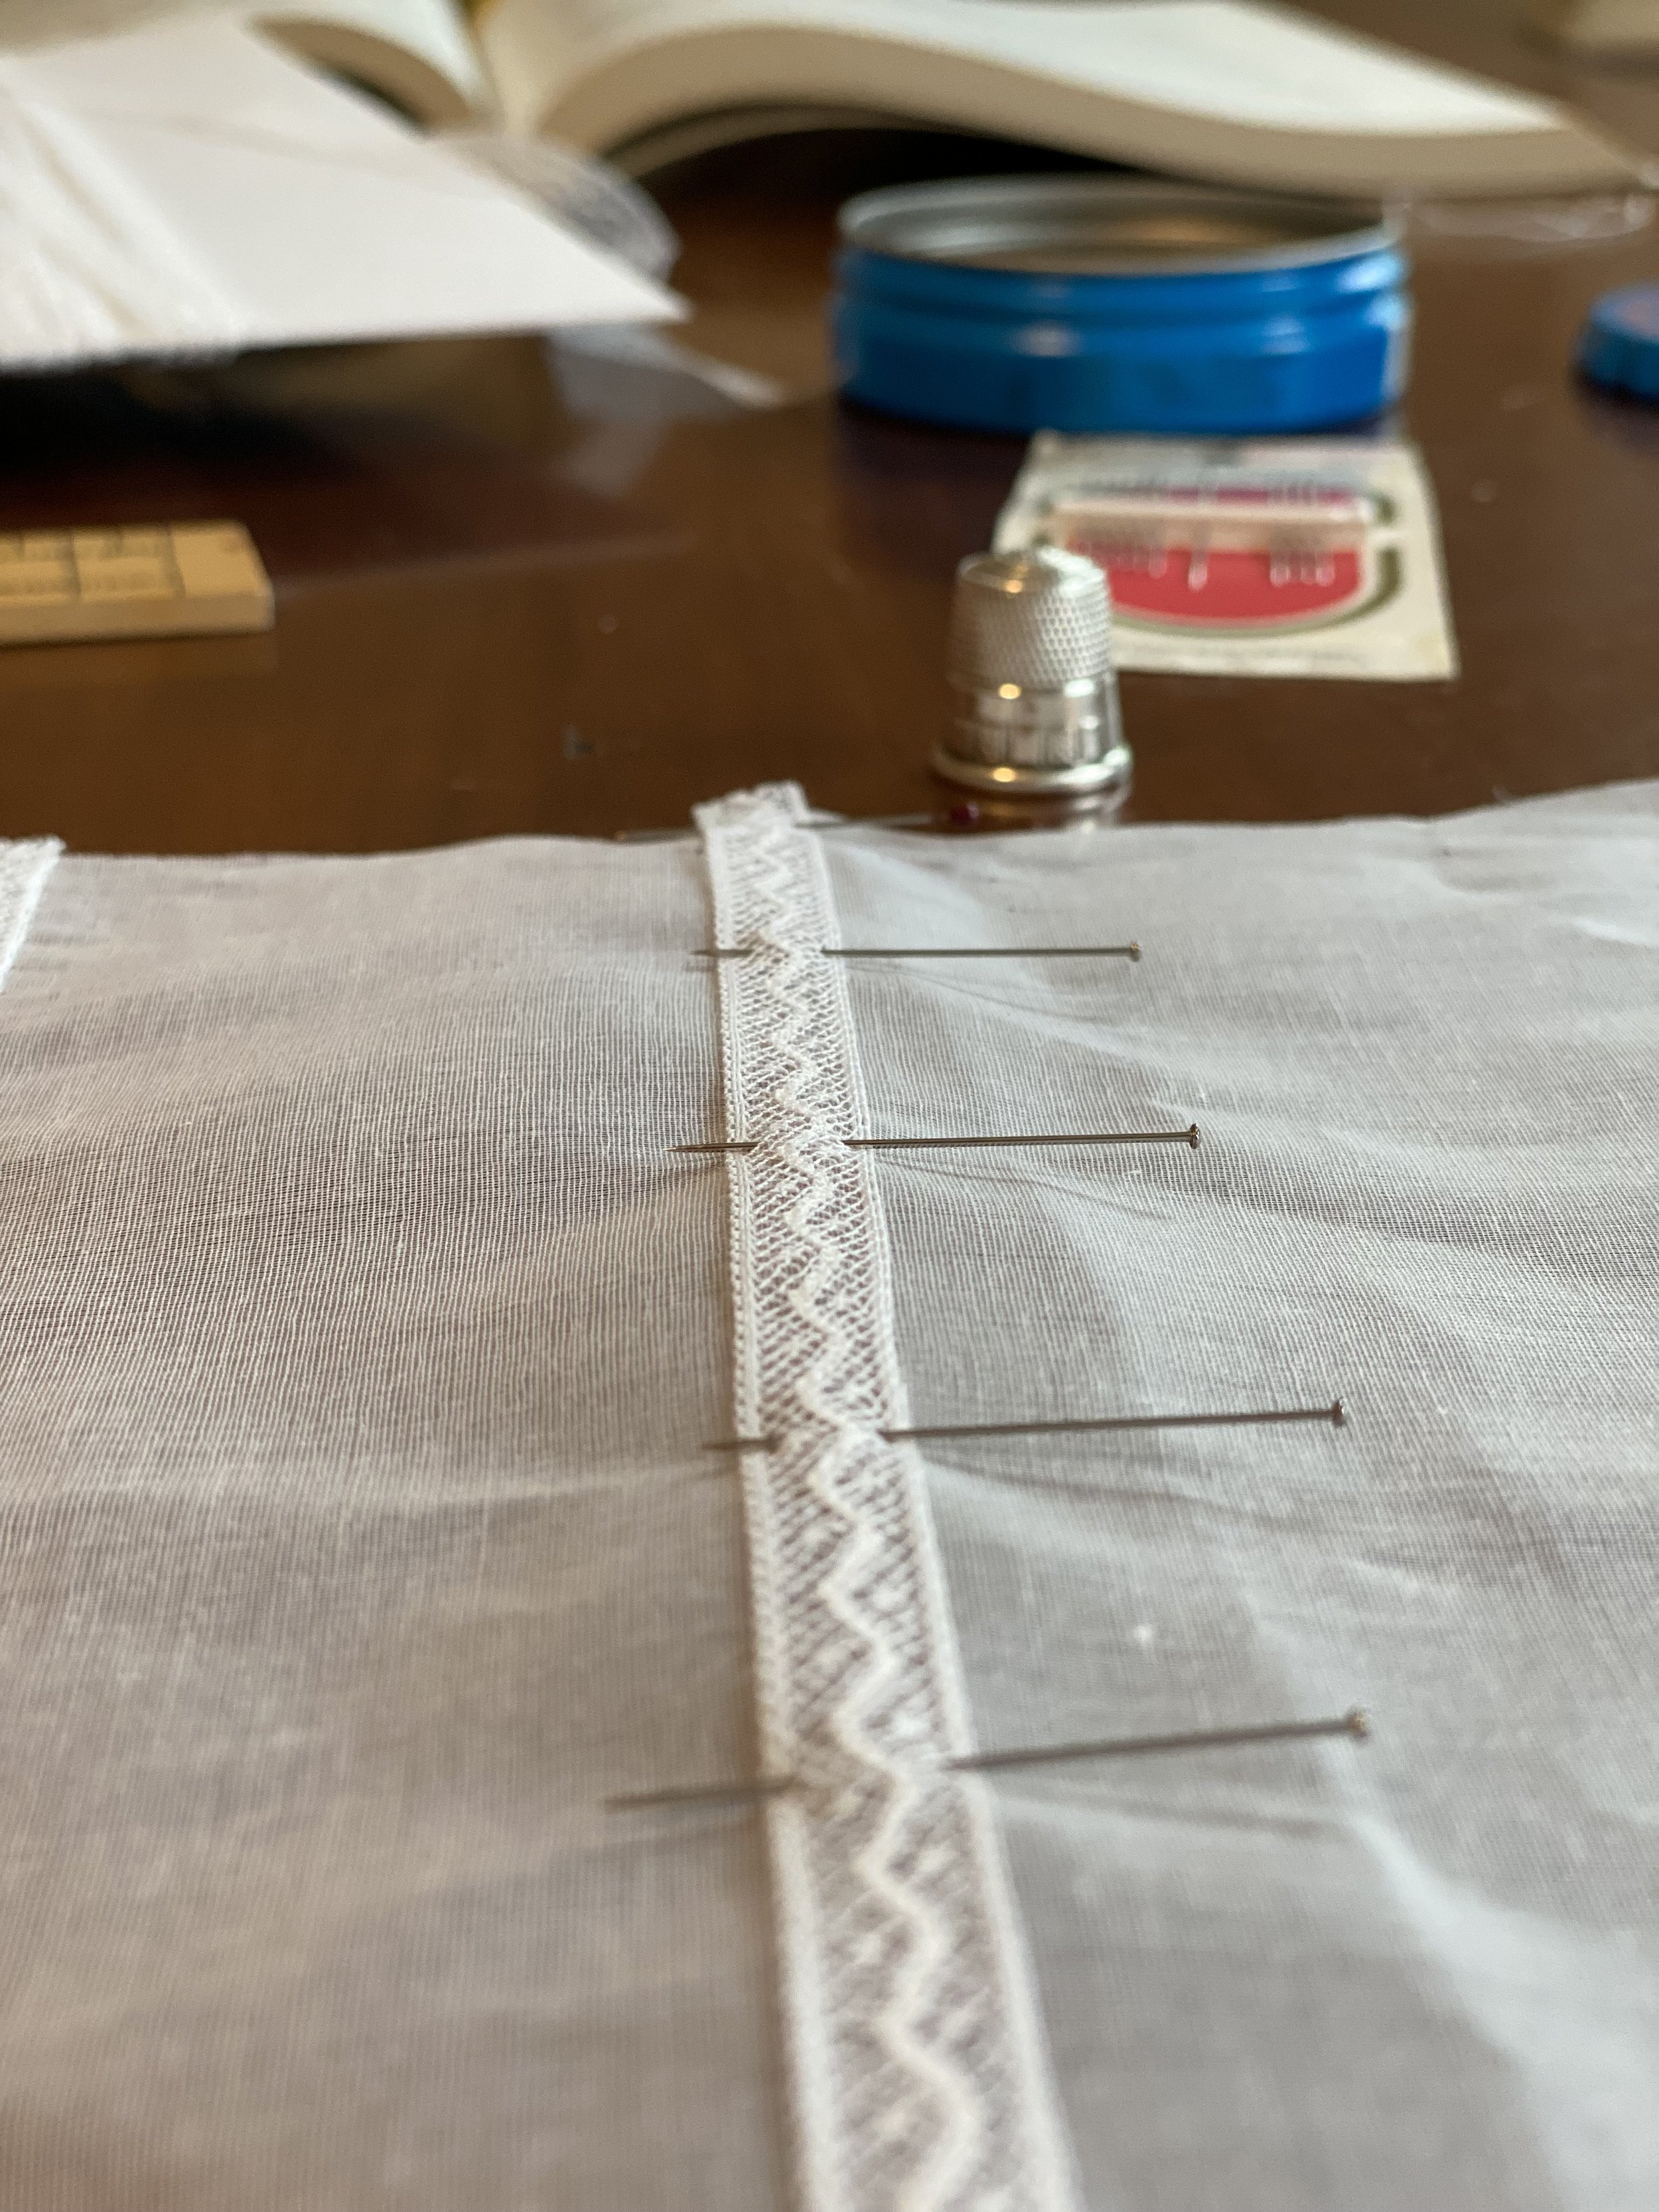
You should have about 1/4”/6mm worth of fabric rolled up in your hem. Like this:

To avoid flattening your rolled hem practice your technique with these videos:

Hand-Sewn Lace Insertion

The following tutorial guides you through how I did lace insertion for the most recent cap I stitched for a museum in Tennessee. It is a cap based on a portrait of Susan Winchester c. 1817. You can read about that project here. While I used this insertion technique on this cap you can apply it to any lace insertion project you may be inspired to stitch up!

Make sure you scroll to the end— there list of the materials I used for this insertion project.

I am using a lace designed for insertion. The two selvedges are finished and are straight. I pinned the lace on outside of the cotton organdy, making sure the right side of lace is facing up. Notice how the lace is follow the grain line of the fabric. The edges of the lace are parallel to the edges of the grain line of the textile. I pinned the lace to the fabric perpendicular to the lace using very sharp dressmakers pins.

I used a felling stitch to sew down the lace. Stitching with Gutermann silk thread I stitched the loops of the edge of the lace’s selvedge to the fabric about 8-10 stitches to the inch. I pinned, then sewed, then I positioned my next piece of lace across the section I was working.

Once I was done sewing all my lace down I turned the work over and took my small embroidery scissors and carefully cut the cotton organdy spacing my cut mid-way between the selvedges of the lace. (ONLY the cotton!! do not cut the lace!)

I opened up the raw edges from the backside of the work.

I folded the raw edges of the cut edge up once and then up a second time and felled the folded edge down using a felling stitch. I did about 8-10 stitches per inch.

Finished insertion from the back.

Finished insertion from the front.

All insertion in cap!

Materials used:

French Val Lace #21279: http://importedlaces.com/imported-laces-online-catalog-page68.html

Cotton Organdy: Textilefabricstore.com

White Gutermann silk thread: https://www.joann.com/silk-800-white/2976934.html

Size 8-10 betweens/quilters needles (antique)

 Pulling Threads

Pulling threads out of the weave structure of a textiles is a fantastic technique to have in your hand-sewing tool kit. I recommend using this cutting technique when cutting out geometric garments made from medium to lightweight wovens that you intend to hand stitch. I love this technique because it allows you to have a perfectly straight-line along the grain. When I make an historical shirt, for example, the seam-allowances (or turnings as they were called) are very small. Having a perfectly straight piece of fabric to work with makes hemming and sewing seams easier and more precise. It is also a great technique to use to “true” (straighten) up the top of your fabric after you have washed it when the top of the textile is frayed and messy.

This technique does take a little bit of practice and patience but it is worth it. If you enjoy the slower, rhythmic nature of hand-sewing you will probably like pulling threads. This technique is a great way to study your fabric and understand the weave structure. If you have been wondering “what is a warp?” “what is the straight of grain?” this process intimately engages you with the textiles and its weave structure.

To “true” up the top of your fabric: lay the textile out on a large surface with the messy edge parallel to the edge. The frayed edge is parallel with the “weft” or “cross-grain” of your textile. The straight edge of fabric that has a finished edge is called the “selvedge.” The selvedge runs parallel with what is called the “straight-of-grain.”

Carefully study the top of your fabric. Notice how it is not straight, it is curvy or almost like a stair-step. This is because weft yarns have pulled out of the weave structure in different sections. Notice in the image above how there is more fabric towards the top and less fabric towards where I began cutting. This is because more weft yarns have been pulled out closure to where I started cutting. You want to begin cutting and pulling a thread on the side of the selvedge that the most weft yarns have been removed. When you cut and remove a weft thread you do not want to hit a section that the weft threads have already been removed.

To begin: Use your dressmakers shears to cut perpendicular into the selvedge. Try to cut between two yarns along the weft.

Pull the cut section apart. A weft thread should pull out of the weave structure. This weft thread is now your best friend. This is the thread you will remove from across the weft. If a weft thread does not easily dislodge from the fabric, use a pin to gently pull it out of the weave structure.

Hold the base of the weft thread that is still in the textile with your non-dominant hand and gently pull the loose weft thread with your dominant hand. The fabric will likely start to pucker as seen in the image above. Use your non-dominant hand to push that puckering across the weft. It is likely at some point the weft thread you are removing is going to break. Great! Pull that out. Note: if the weft is being ornery grab a pin and use the tip of the pin to carefully dip the tip under the yarn and pull it up and away from you.

Notice above how the weft yarn has been removed from the fabric. It creates a small voided space.

Grab your dressmakers shears and cut along this voided space until you get to the point where the yarn is still in the weft. When you get to this point you will cut very carefully in-between the weft thread you are removing and yarn next to it.

Then coax your weft thread out of the weave structure with a pin. Pull it (or keep using the pin to pull it up and out) again like you did before. Repeat this process of pulling the yarn out and cutting along the voided space until you get across the entire width of the fabric.

Look at this beautiful straight edge! Now you can confidently measure down into the fabric using this top edge knowing it is “true” or straight.

Once the top of the fabric is “true” you can cut out your garment. I do this by measuring along the warp and across the weft to create different rectangular or square shapes depending on the garment. This image shows me pulling a thread from the warp.

This is a pocket I cut out using the pulling thread technique. I measured up and over to remove the warp and weft threads. Then I cut out this rectangular shape.

I pulled threads before I hemmed this section. You can see how the folded hem is straight along the grain line. When you pull a thread you can trust the cut edge is straight so you can precisely fold a small hem and trust the width of the fold.

 Hand-Sewing Needles

Felled Seam from

19th-century Chemise

My favorite way to learn how to hand-sew is studying garments that were hand sewn. In my collection I have a French chemise from the mid-19th century. I enjoy looking at the sewing and trying to reverse engineer how it was done. There are numerous ways to do flat-felled seams (4 of them I teach in the “Hand-Sewn Seams course). I think this is another way to do a self-encased felled seam. To make a sample just cut two 12”/ 30cm by 3”/7.5cm piece of fabric and grab a needle and thread that compliment your fabric. Give it a try!

19thc. French chemise flat-felled side seam (outside).

19thc. French chemise flat-felled side seam (inside).


How to make seam:

1.Pin RIGHT SIDES together

2. From the INSIDE baste the raw edges for the side seam back 1 cm or 3/8” between the hem and the sleeve opening.

3. Whipstitch seam from the INSIDE.

4. Take out basting and press the seam allowances in the same direction away from the body of the garment.

5. Trim the only top seam allowance down to half the width.

6. Baste the non-trimmed side over top of the trimmed seam allowance.

7. Open your seam.

8. Fell the fold over.

 Running Stitch Applications for Hand Sewing

Running Stitch Applications for Hand sewing PDF

 Hand-Sewing Books

Curious about some books to help with hand-stitching? Here is an incomplete list of some publications I have in my own collection. I have tried to keep this list focused on hand-sewing construction so there are no books only focused on mending on the list yet… But I do have a bunch I can share. Maybe I will add those later.

For context, these are all in English and are published by people who live in the US. If you have a favorite hand-sewing book let me know!

The Work-woman’s

Guide

by A Lady, 1838.

19th-century sewing manual punished in London. It was one of the first how-to sewing books published in English. The book starts with hand-sewing methods. Also includes construction descriptions and hand-drawn cutting diagrams for different garments.

Home Dressmaking: A Complete Guide to Household Sewing

By Annie E.Myers,

1892.

Late 19th-century sewing manual from the US that discusses sewing methods and hand-sewing techniques.

School needlework: a course of study in sewing designed for use in schools.By Olive C. Hapgood, 1892

Thanks to K for the suggestion. This has fantastic and clear hand drawn diagrams for hand-sewing instruction. Great section on tool selection.

Any Older sewing books!

Typically sewing guides published in the early 20th century or before have a good section on hand-sewing technique. This one is from 1927. Get them from yard sales, Ebay, Etsy, cozy used book shops.

The Lady’s Guide to plain Sewing.

By Kathleen Kannik,

Book I,1996 Book II,1997.

Two small but mighty guides that provide hand-drawn illustrations for a variety of hand-sewing construction techniques. The author is active in the 18th and early-19th-century Midwestern reenactment circles so wrote this book with living historians in mind. However the techniques really apply to anyone interested in hand sewing. Well researched, easy to follow written instructions. However drawn diagrams only show one step. Has a very helpful bibliography.

The Geometry of Hand-Sewing By Natalie Chanin, 2017.

A variety of hand-stitching techniques for construction and decoration. Written for knitwear in mind but also useful on wovens. The author runs the clothing line Alabama Chanin and The School of Making. Great resource for organic jersey and knitwear hand-sewing kits. Simplifies techniques with geometric diagrams and includes templates. Easy to follow illustrations and inspiring color photos of applications.

Hand Sewing Stitch for Garment Construction. By Mathew Gnagy, 2020.

A guide book solely focused on hand-sewing construction methods. Author’s background is in Spanish tailoring from the 16th and 17th centuries which informs the tools and techniques taught in the book. Good close up colored photos of techniques. Includes several 16th-century projects as well as jeans and a hoodie.

Hand Sewing Clothing: A Guide. By Louisa Owen Sonstroem, 2020.

A comprehensive and accessible hand-sewing reference guide intended for all readers. The author begins the book with essays to contextualize the benefits of hand sewing, slow fashion, the speed of hand sewing, sustainability and circular design. There is a robust section on different stitching methods with hand-drawn illustrations with companion descriptions. And an inspiring section with examples and stories of hand-sewn clothing the author has made. It is finished off with a helpful glossary, resources and reference list.

Hand-Sewing Stitch Guide. By Fibr&Cloth Studio with Illustrations by Louisa Owen Sonstroem, 2021.

A very helpful, easy-to-follow reference guide for the modern hand-sewist with drawn illustrations. Includes basic stitches and construction techniques. Intended to compliment Fibr&Cloth Studio’s hand sewing kits and digital patterns.

Make Sew and Mend, by Bernadette Banner, 2022.

Hand-sewing reference book designed to embrace slow fashion through teaching basic hand-stitches, applied techniques and wardrobe maintenance with inspiration from the late 19th century. Author is a well-known YouTuber from NYC, now based in London with a background in late 19th-century dress recreation. Author spends time talking about fabrics and tools. The instruction section includes some original garments from the 19th century. The instructions are step-by-step color pictures with text. Good essays in between each chapter to bring in sewing and style voices who have different identities from the author.