Welcome!

Sarah Woodyard wears a French nightcap the style we will make in this class. She is stitching on a Quaker cap. Photo: Fred Blystone.

In this on-demand workshop you will learn how to stitch a simple, hand-sewn linen cap inspired by the designs worn in The Atlantic World, c.1775-1800. This style was referred to as a “French nightcap” in English. Even though it was called a nightcap this style was worn during the day to demonstrate an understanding of fashion and protecting the wearer’s hair while doing work.

We will be using a light-weight linen to make this cap and decorating it with a simple silk ribbon. This style made from these materials is appropriate wear for doing work like laundry, stitching, being a ladies maid, shopkeeping, etc. It’s not fancy, but it is also not plain. The construction details taught in this class are based off of my study of a variety of extant caps from this time period and my 10-years of experience studying and stitching 18th-century style clothing by hand. To learn more about your teacher, Sarah Woodyard click here.

French nightcap laying flat on table with sections labeled.

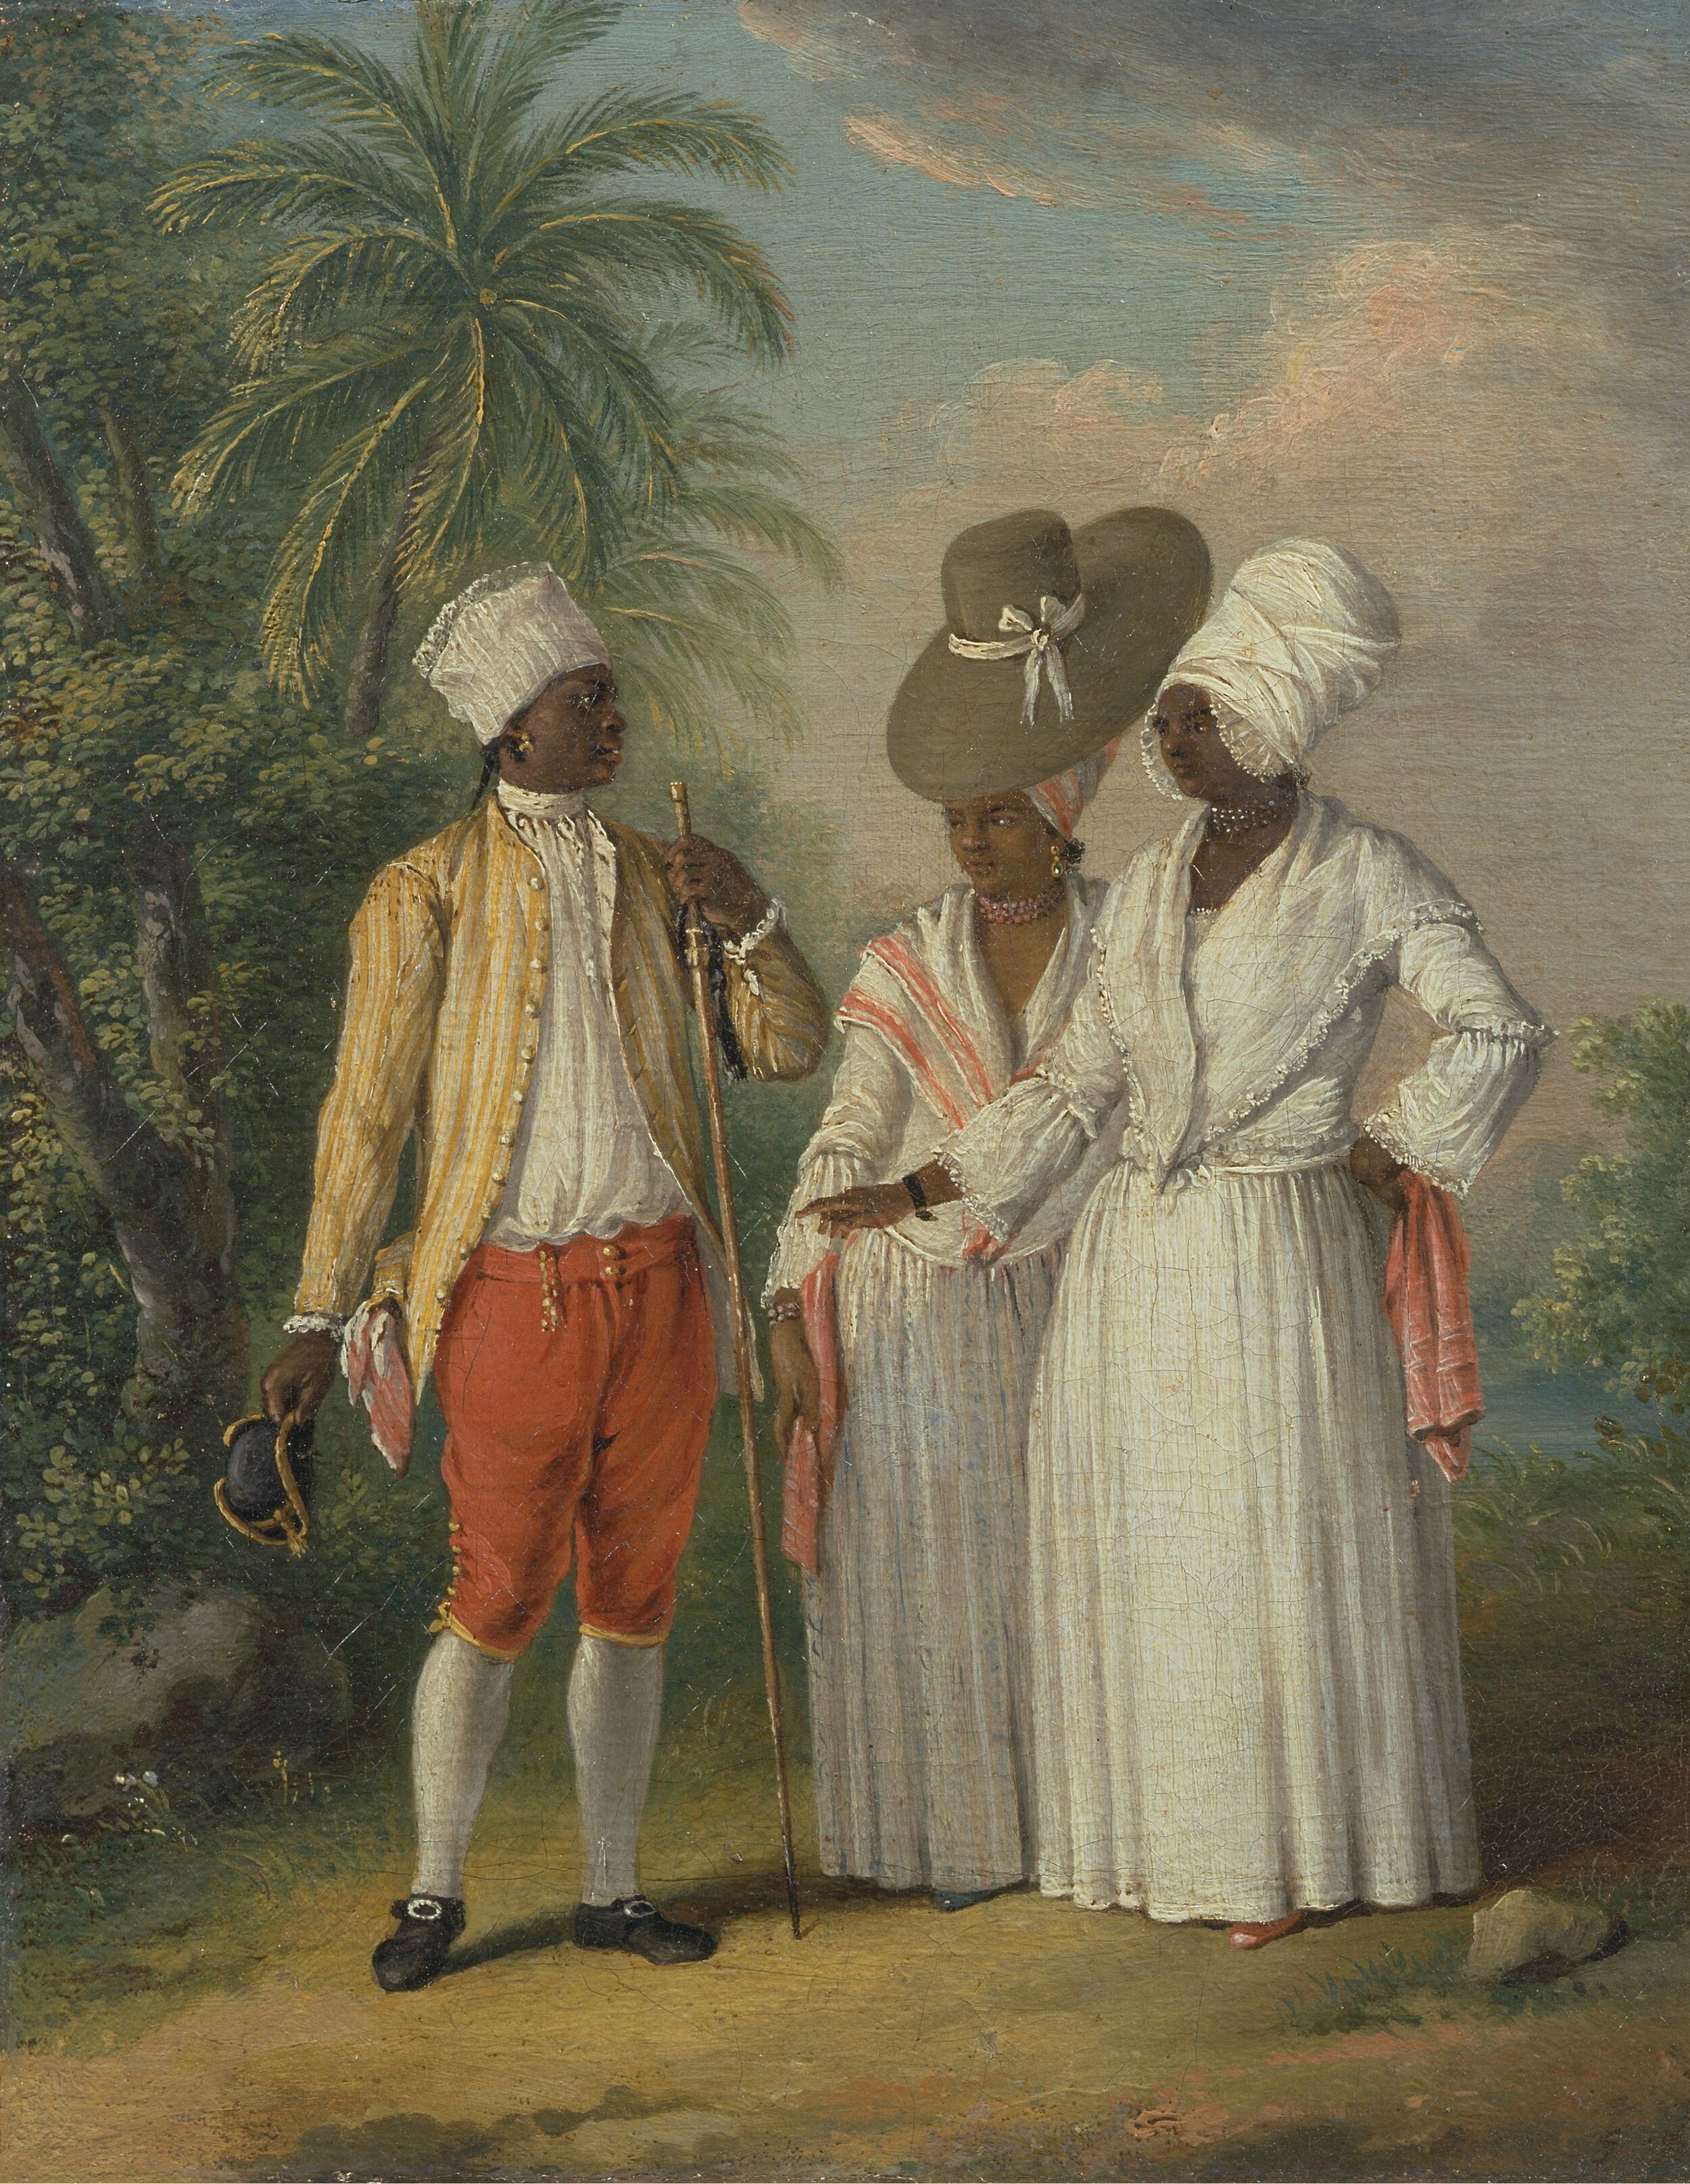
Many women from the African Diaspora wore head wraps for fashion and protection. Some wore caps and others left their hair uncovered. In this image you can see how a French nightcap is worn underneath a head wrap. Agostino Brunias, 1728–1796, Italian, active in Britain (1758–70; 1777-80s), Free West Indian Dominicans, ca. 1770, Oil on canvas, Yale Center for British Art, Paul Mellon Collection, B1981.25.74 Public Domain.

This image shows two different styles of a “French nightcap.” The one we are making is based on the woman in the bottom left. Note how depending on fabric and decoration it can go from simple, pretty and practical to something more ostentatious. Autumn. C. 1778/79. British. Accession number 148219001© The Trustees of the British Museum


Workshop Format

Detail: whip gathering for border aka ruffle with hemmed band behind.

This workshop is organized in a series of sections with pre-recorded, close-captioned videos as the key manner of instruction. I strongly encourage you to watch the video before you start sewing. This class is designed for you to go at your own pace using the pre-recorded videos for instruction. Pause, rewatch and review to hone your cap patterning and sewing skills. The goal of this class is to teach you how to draft the pattern and to hand stitch a “French nightcap.” Remember hand sewing is a practice. The goal is not to be an “expert” but to build a skill-set and continue to be curious. Let’s get to practicing!

Cut out pieces of “French night cap.” Upper left: Caul. Right: Two bands. Bottom left: Two borders aka ruffles.


Class Schedule (subject to change)

Posted May 13/14: Wash fabric; Pattern cap; Cut out cap.

Posted May 21: Rolled hems on borders.

Posted May 28: Small flat hems on bands.

Posted June 3/4: Whipstitch borders in preparation for whipped-gathers; Whip-gather boarders to bands.

Posted June 10/11: Lecture, Hem straight sections of caul; Sew caul drawstring with eyelet; Whipstitch curve piece of caul in preparation for whipped-gathers.

Posted June 18/19: Whip-gather bands to caul; Create ribbon trim.

Posted June 24/25: How to wear your cap.


 Honor and Remember

In this section please take a moment to honor and remember some seamstresses and individuals who were part of the African-diaspora during the time this cap was worn in the “Atlantic World.” We have the privilege and freewill to stitch this cap, many in 18th-century “Atlantic World” did not. The individuals listed below were enslaved or self-liberated in 18th-century Virginia when enslaved labor funded and stitched the fashion industry together. A similar labor structure is still used in the fashion and textile industry. It is important to remember and respect clothing makers, now and then.

The first seven people on this list were owned by enslaver Margaret Hunter. I worked and trained at the Margaret Hunter Millinery Shop (mhms) for 10 years. I have studied a cap that Caroline, Charlot and Oney Judge all had the skill to make. Therefore the skills taught in this class have a lineage back to these men and women. Next to their names I have listed where they lived and worked. If you visit these spaces please say their names. While we stitch this cap let these individuals be known and remembered.

Jenny (mhms)

Agga (mhms)

Milly (mhms)

Sall (mhms)

Will (mhms)

A child (mhms)

Chavers (mhms)

Sarah (self-liberated)

Charlot (Mount Vernon)

Caroline (Mount Vernon)

Sall (Mount Vernon)

Alice (Mount Vernon)
Brass
(Mount Vernon)

Sinah (self-liberated)

Betty (Mount Vernon)

Oney Judge (self-liberated)

Sarah (Williamsburg)

Rachel (Sarah’s child) (Williamsburg)

Lucy

Unnamed


 Materials and Supplies

We have collaborated with Zadie Grossman fabrics to create a kit with all the materials you need to make this cap! You will also need some tools, scroll down to see this list.

Get your kit here!

Kit Includes:

1 yard White Linen

1 yard 1/32" cotton cording

2 yard of 1" silk taffeta ribbon in your choice of burgundy or indigo. (This ribbon is hand dyed and slight imperfections are normal.)

1 spool of White 100/3 Linen Thread

1 Bohin hand sewing needle, size 9 sharp

1 Hand Poured Beeswax Cake

10 Straight Pins


You will also need the following tools:

Dressmakers shears 8-10”

  • My favorite shears are from William Whiteley and Co. in England who preserve the scissor making craft. Buy them here!

Small snips: Look for “embroidery” scissors.

  • My favorite small scissors are from William Whiteley and Co. in England who preserve the scissor making craft. Buy them here!

1yd of pattern paper or scrap fabric for pattern making.

  • For example: butchers paper (at local hardware store), light weight poster board, taped together paper grocery sack, back side of wrapping paper, an old bedsheet or muslin.

Pencil

Yard stick OR Pattern making ruler with grid. These are great!

Seam gauge

Awl

Bodkin (small safety pin works too!)

Spray starch

  • This will be used to stabilize the fabric for sewing. Make it or buy it. Here is a nice choice but any will do.

Thimble (optional but encouraged): Should fit on the middle finger of your dominate hand. Not too tight but not too loose it falls off. Learn how to use one here!

  • Where to buy: Antique malls, eBay, etsy, Lacis has a fantastic stock here.

 Patterning

Caul and band paper pattern.

In this section you will draft out two pieces for the cap: the caul and the band (see image). The border aka ruffle is not drafted, it will be cut directly from the fabric. Please use the “Cap Cutting Diagram” (also see below) for measurement guides. I would encourage you to follow these measurements for this cap. Once it is made up you will have a good idea if the pattern needs to be changed for you. However, at the the end of the class we will talk about how to wear the cap and make it look good!

In this section you will need: a pencil, ruler (gridded pattern maker rulers are great for this) about a yard of pattern paper or scrap fabric. For example: butchers paper (at local hardware store), light weight poster board, taped together paper grocery sack, back side of wrapping paper, an old bedsheet or muslin.


Take a moment to study the different sections and shapes of the cap. Below the image of the cap being worn is a discussion about how the cap measurements relate to the head.

This shows the different pieces of the cap and how they together. The band is shaped to give a nice curved towards the face. This was the style in “French night caps” c. 1775-1800.

You can see in this image how the caul goes over top of the hair from the crown of the head to the hair line. The band is made of two pieces that in total measure the distance from about mid-ear up and over the crown of the head to mid-ear (like a headband). The ruffle is double the length of the band around the section it is stitched. Photo: Fred Blystone.


In this video you will be guided to draft out one caul and one band. We will cut out the border aka ruffle in the next section when we cut the fabric.

 Cutting Out the Cap

In this section we will use the patterns made in the last section to cut out the caul and band. We will also cut out the border aka ruffles without the use of a pattern. Watch the video at the end of this section for instructions on how to lay out the patterns and cut out of the borders.

You will cut out:

-One caul

-Three bands (two for the cap and one for practice)

-Three borders (two for cap and one for practice)

You will need: 1 yard of linen, pattern pieces, dressmakers shears, small embroidery scissors, pins, pencil and starch.

Before you cut out our fabric: You will need to wash you linen on hot and tumble dry. Once the linen is dry iron it with starch or some form of stabilizing agent.

 Hemming Borders aka Ruffles

In this section we will hem the two borders. We will use a rolled hem to do a very small 1/16-1/8”/ 2-4mm hem. We will hem the two short sides and then the one long side towards the inside or “wrong side” of the borders. Leaving the second long side not hemmed for the time being. I would strongly encourage you practice your hemming and rolled hems first on the third sample border you cut out before hemming the real borders. Follow along with the two practice videos below before moving onto the last video for hemming the borders.

You will need: 1 sample border, 2 borders, needle, fine white thread, beeswax if using linen thread, seam gauge, thimble.

Practice videos (left handed on left; right handed on right):

Hemming

Rolled Hems

Hemming Borders Videos:

 Hemming Bands

In this section you will hem two bands. The hem will be a flat hem. Not a rolled hem like we did before. Done at 1/8”/4mm using a small running stitch. I would strongly encourage you to do at least one practice piece or even two. The bands are cut with a strong curve meaning they are on the bias and stretch more than if cut on the straight of grain. Follow the video below for instructions.

You will need: Two bands and at least one for practice, needle, wax, thread, small scissors, thimble and a seam gauge.

You will hem two bands with a finished 1/8”/ 4mm hem.

Hemming seen from the outside or “wrong side” of the band.

Hemming towards the inside of the band or “wrong side.”

Hemming Bands Video

 Whip-Gathering Borders to Bands

In this section we will whip-gather our borders to our bands. We will end up with two borders with borders attached (see image below).

You will need: linen thread, wax, needle, thimble, small scissors, pins, 2 borders, 2 bands. If you want to practice beforehand grab your third border you used to practice your rolled hems.

Whip-Gathering Borders to Bands Videos

 Caul Drawstring

Detail: caul drawstring

In this section you will create a drawstring at the base of the caul. This drawstring is used to fit the back of the cap to your head. The two videos below will guide you through the steps to:

  1. Hem the straight, vertical sides of the caul to prepare for drawstring (1st video).

  2. Sew eyelets at the center back (2nd video).

  3. Fold up and stitch the casing (2nd video).

  4. Put a drawstring through the casing (2nd video).

You will need: the caul, cord, thread, wax, needle, thimble, pencil, seam gauge, pins, small scissors, awl, safety pin or bodkin.

Hemming the Caul Videos

Drawstring Casing Videos

 Attaching Caul

Band/Borders attached to the caul.

Whip-stitching the caul to the border/bands.

In this section our cap with come together! We will sew the caul to the band/borders. We will use a whip-stitch and whip-gathering technique like we used when we attached the borders to the bands. The video below will guide you through the process.

You will need: thread, wax, needle, thimble, pins, caul, 2 borders/bands.

Attaching Caul Videos