
Stitching Art into Life: Recreating Susan Winchester’s Cap, c. 1817.

Susan Winchester, ca.1817 by Ralph EW Earl, Cragfont.
Photo: Sarah Woodyard.
What have I been working on? A lot of lace and tiny hems to say the least! In this photo essay I wanted to bring you along my process of recreating a cap from a portrait from Tennessee c. 1817.
I was invited to join the grant “TN Wars Commission Grant: War and the Homefront 1812 - 1865 Through the Material Culture of Clothing” by Tonya Staggs, Executive Director, Historic Castalian Springs. I recreated the cap and the chemisette seen in this portrait of Susan Winchester that hangs in the hall at her home Cragfont. My involvement to bring these garments to life was only a part of the grant. My husband re-created a set of clothing seen in Susan Winchester’s husband, General Winchester’s, companion portrait. Another maker re-created clothing to represent an enslaved individual at Cragfont.
While they do not know a lot about the enslaved community— it is imporant to acknowledge these individuals are seen in these portraits too. Through the labor they likely contributed to maintaining the Winchester’s clothing, to the wealth their labor generated to have the portraits made and maintained. Thinking about the portaits as part of these enslaved individuals visual landscape is also part of these objects story. The portaits currently reside in the main hallway, at the end of the hall is a set of stairs that leads down to the kitchen where an enslaved woman cooked. If the portraits hung in the hall in her lifetime she would have walked by them multiple times a day. For more information about the site go here: https://www.historiccastaliansprings.org/cragfont
I had the opportunity to visit Cragfont and see the portrait in person, as well as a tintype of Susan as an older woman. (To my delight she was wearing a cap in the tintype too!) Seeing a portrait of her younger self and then the image of her as an older woman was very humanizing. That is one of the reasons I am drawn to making clothing for museums and why re-creating a garment worn in this portrait was such an interesting project for me. A 2D painting keeps you removed from the person painted but a tangible 3D object that is almost within reach— it breaths life into the material landscape. Clothing is so personal, having a tangible object on display is like the person just stepped out of the room. I find it to be a very effective way to tell a story. While there are many layers to this project, for this essay I will bring you along on my process taking the cap out of the portrait and on to my needle.

Detail: Susan Winchester, ca.1817 by Ralph EW Earl, Cragfont. https://www.historiccastaliansprings.org/cragfont
Photo: Sarah Woodyard.
Tonya and I brainstormed what each component could be. The material of the cap could be netting or a lightweight cotton. The little spots could be embroidery or it could represent lace or just highlights. There appears to be a separate border at the front that could be fabric or it could be lace. And there appears to be a smaller crown at the back of the cap with a band of trim around it. As I studied this cap I was also thinking back to other historic caps I have studied from this time frame. We settled on using fine cotton for the border and body of the cap and interpreted the lines with the dots as lace insertion.
Textiles: While we were in Nashville I stopped into Textile Fabrics to see what fine fabrics they had on the shelves. They have a lovely section of heirloom sewing textiles. I found a cotton organdy that had a really good body to it. I thought this would work nicely for the ruff on the chemisette and the cap. I wanted to match the cap and the ruff textiles. I was also mindful about making a garment that would be easy for the museum staff to maintain. Historically, this cap would have been washed and starched— it is unlikely they were going to do this so starting with a stiffer material would give the body to the garment without the need for maintenance.

Detail: Workwoman’s Guide. p.124
Patterning: I had never seen a cap like this before so I went down the research rabbit hole to look for caps like it in contemporary portraits, online collections and fashion prints. Oddly enough, I could not find a cap like the one in the portrait in these sources. Then I cracked the pages of the Workwoman’s Guide. This guide was first published in England in 1838. You can read and reference it here. On page 124 under figure 4 was a drawing of a cap that had the crown with a pleated trim around it (!!) And to the left of this illustration is the patterning diagram for this style. On p.125 were the instructions for how to pattern this “Morning Cap.” Thank goodness for the Workwoman’s Guide. They use nails as a unit of measure in this book so I needed to convert to inches. A nail= 2.25”
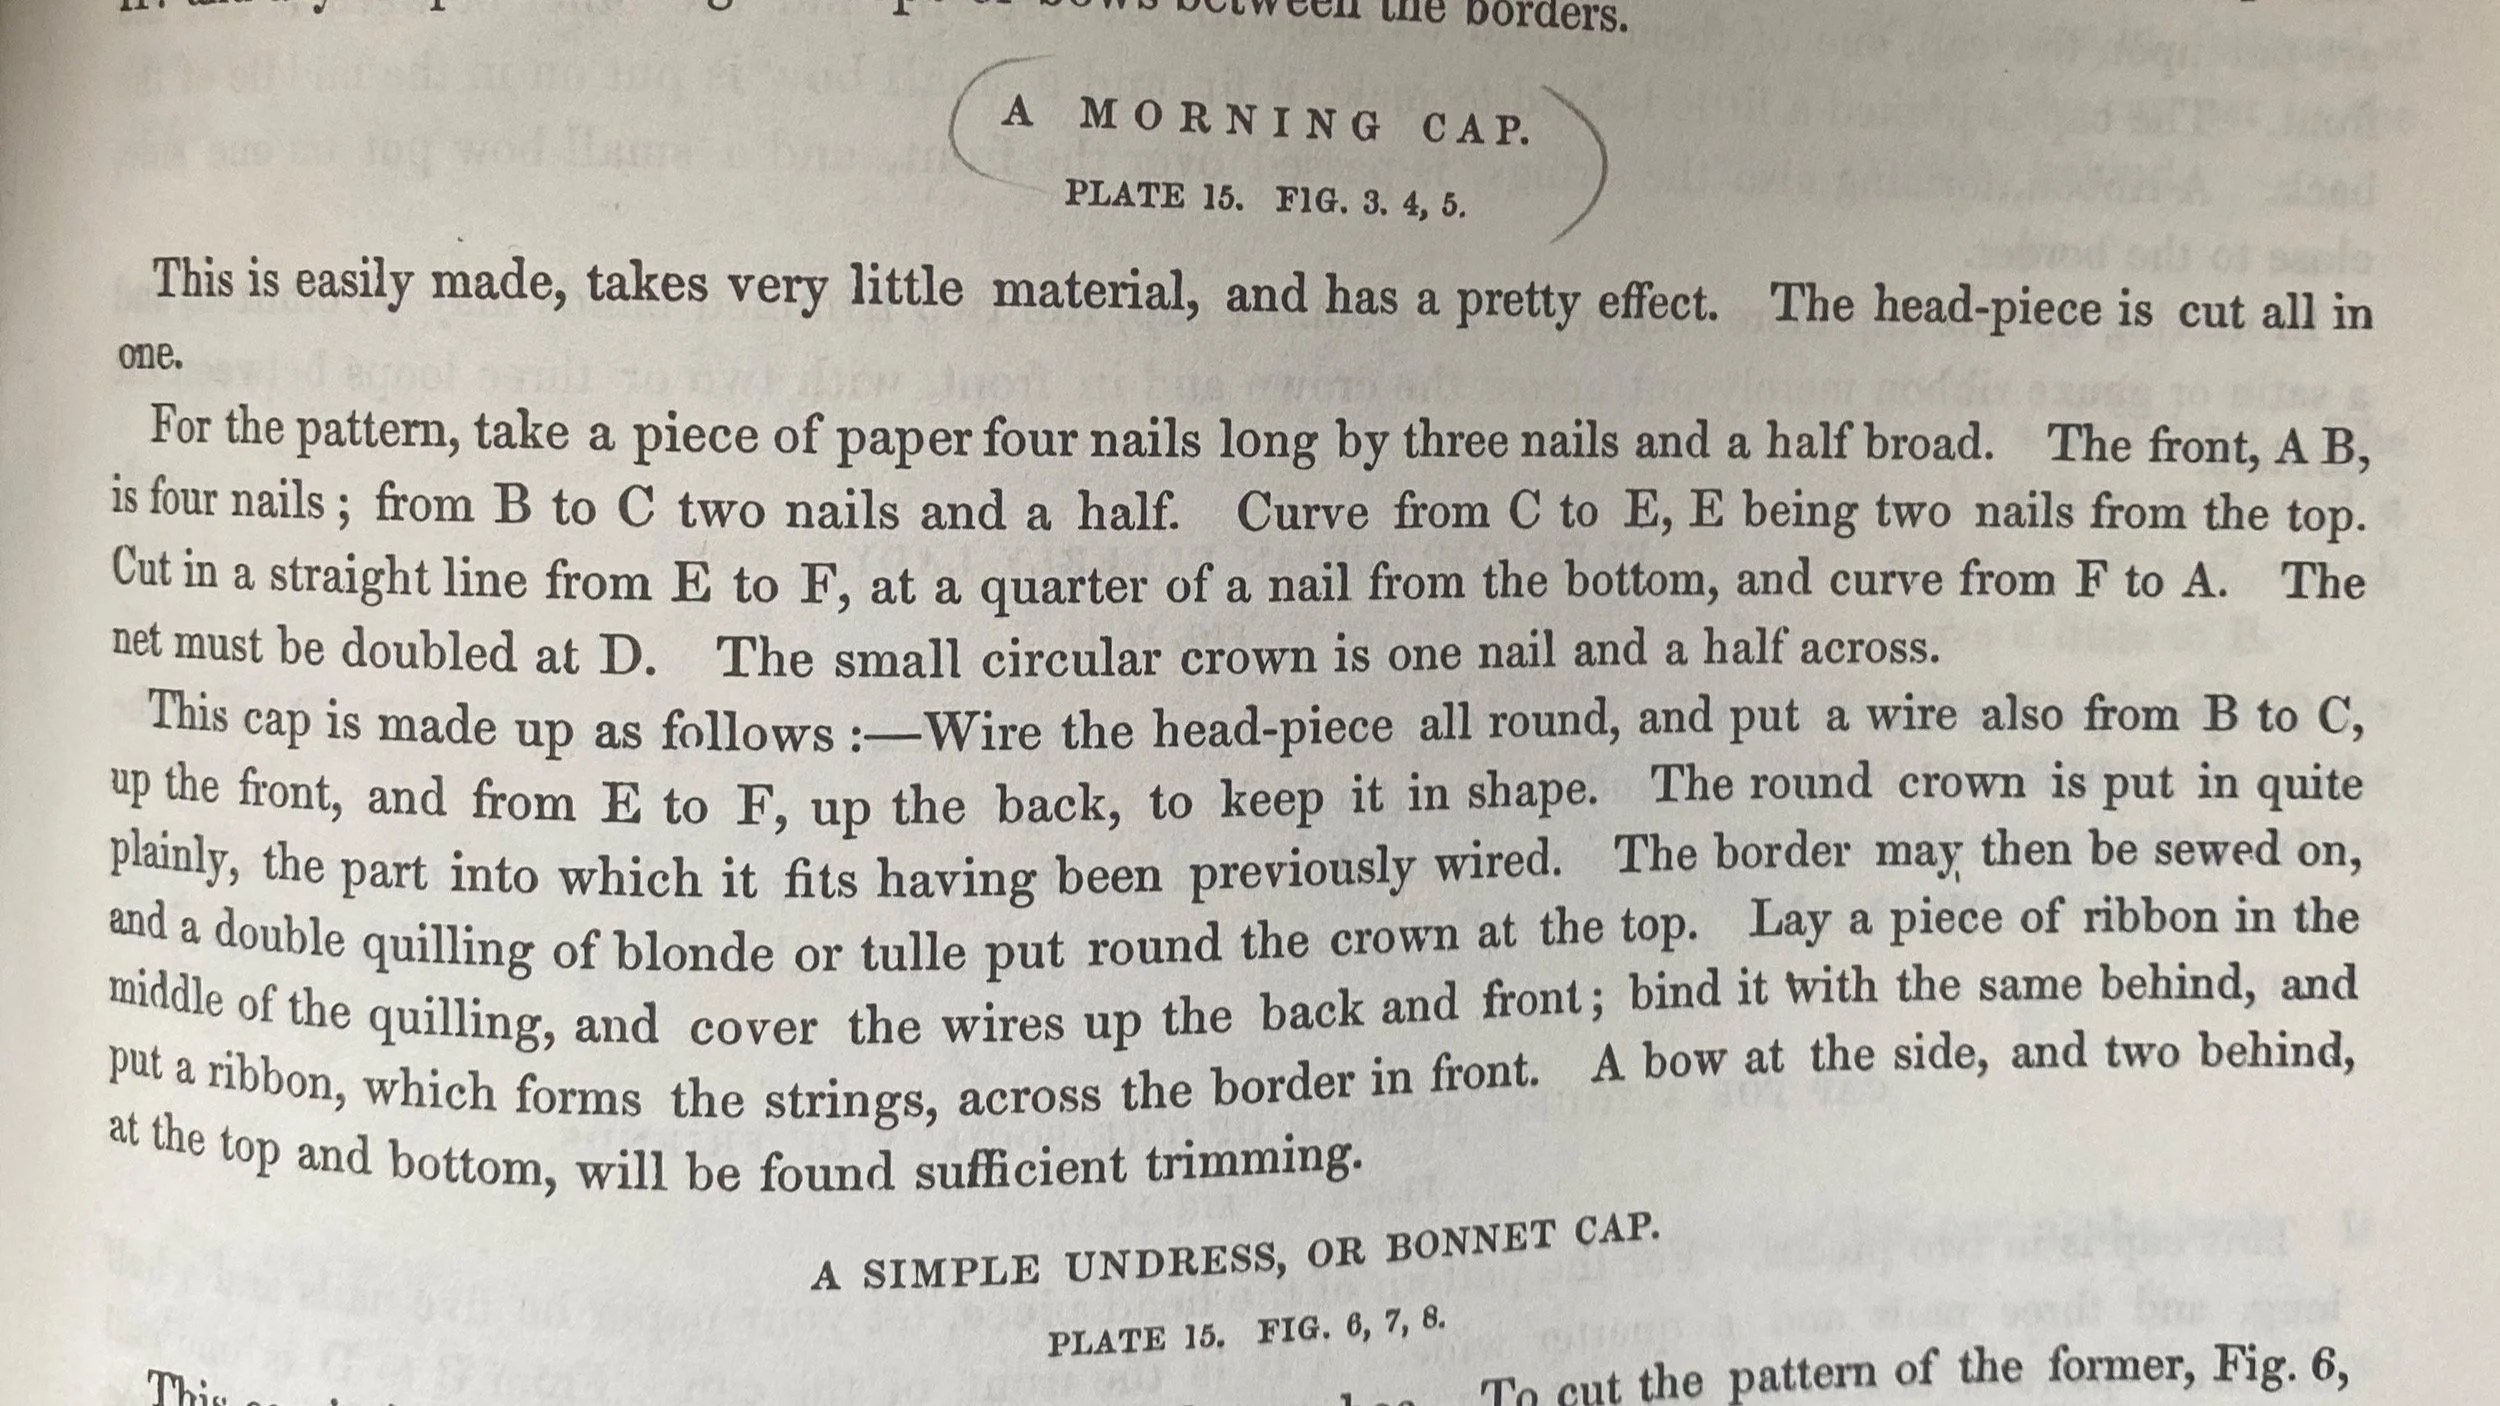
Detail: Workwoman’s Guide. p.125. Instructions on how to pattern out the Morning Cap.

Pattern drafting shapes. You are looking at the side of the cap.
The patterning technique in the book has you draw a rectangle of a specific dimension to establish points and then plot points inside of the rectangle to create the shape of the cap. The curves are drawn freehand by connecting two points. I referenced the line drawing in the book and mimicked the shape of the curve they drew in the diagram. For the crown you just draft out a circle. This circle corresponded with the curve of the crown. However, it did not have to be the exact size of the crown since the crown opening was gathered down to fit the circle.
I drafted the pattern and tried it on but it was a wee too small so I went back and added some width to the back of the cap. It took about three tries of pattern adjustment and trying on to get a good shape that fit my head.

Body and crown of cap. This is the cap folded over the top of the head. The face opening is on the left side, the neck is the bottom, the center back is the angled portion to the right and the crown is the curve that connects the top of the head to the center back. The circle is the crown.

Pinning lace to the cotton organdy. For full lace insertion tutorial go here.
Lace: The first step for me was to do the lace insertion on the body of the cap. The lace I chose was “French Val lace” from Imported Laces. It is a lace that is designed to be used for insertion. This means it has two finished edges so fabric can be stitched to both sides of the selvedge. I have created a tutorial walking you through the steps I used to stitch the insertion lace here.
Sewing the cap:

Each strip of lace is carefully measurement and then felled down.

All the pieces of lace felled into place. This oddly looks like a yoke for a bodice. To orient you: the top of the head is the shortest piece of lace. The u-shape is where the crown will be inserted. The soft curve that is parallel to the bottom of the image is the face opening laid flat.

Detailed view of felling back the cotton for insertion. Here is the tutorial for lace insertion.

I used these vintage needles. For a lot of garment construction I like to use a sharps because they are a little longer but for this project I needed a slightly shorter needle. A between/quilters needle was the perfect length. I ended up using 3 needles. It was important with the lace and fine fabric the needles were always very sharp. I used a size 8-10 in this pack of antique needles.

Once the lace was inserted I hemmed all the way around the body of the cap at about 1/8”/ 4mm. I did not hem the curve because the center back seam had more lace to be stitched to it and the crown section was going to be whip-gathered in place.

I hemmed the circle. While I am very happy with how the lace insertion came out, I am the most proud of this tiny little circle. Hemming on the bias is extremely difficult and I was very pleased with this result. I used a tiny running stitch and you can see how I pulled the running stitch a little bit around the curves to ease in the bias. I used this technique because I have seen small running stitches used like this to control the bias on antique caps.

Detail of the circle set into the crown. I whip-gathering the curve at the the back to gather it to the right dimension of the circle and then whipped the circle to the gathers. The line of lace you see extending down from the circle is a piece of lace I attached at the center back to close off the crown. I chose to put this lace at the center back because I have seen this done on antique caps.

Inside of crown whip-gathered into place.

Body of cap finished! Next was attaching the borders (ruffles) to the front of the cap and around the bottom. And the pleated trim around the crown.

This is the finished cap with all the borders and trim added. You can see the amount of fabric that was gathered across the front of the cap. What I do not have pictures of are the yards and yards of rolled hems I did for the borders. The front of the cap has a border that was made with 90” / 225 cm piece of fabric that was folded over on itself to make a double ruffle. So that is 180” / 450 cm of rolled hems on that border alone. The folded section was then whip-gathered to the front of the cap.

Detail of the border whip-gathered around the bottom of the cap.

Detail of the pleated trim going around the crown. I used knife pleats and topstitched them down.

Center back of the cap.

Top and front of the cap. If you ever make a cap you have to put ribbon on it. That is something people often forget. However most caps had some form of ribbon decoration. Notice the saw-tooth edging. This is seen in the portrait and is seen in Western fashion in the 18th and 19th centuries on edges of ribbons.

Maggie with her ribbon.
This is some of my fabric type of sewing, small delicate stitching. Most of the time spent on this cap was rolling hems and then whip-gathering. In total the cap took about 30 hours of work. Now that I have made this version I would be interested to make another version with embroidered netting. A lot of caps from this time period were made from netting. That is the benefit to making a piece like this, you learn as you go. And in the end its a bit of an art project mixed with an experiment. I look forward to seeing this cap on display bringing this portrait to life.
https://www.historiccastaliansprings.org/cragfont
https://www.historiccastaliansprings.org/the-enslaved-community-of-cragfont